Are you tired of sacrificing flavor for health when it comes to snacks? Look no further than these decadent yet nutritious Cake Batter Protein Balls! These delightful little bites combine the rich taste of cake batter with a boost of protein, making them perfect for satisfying your sweet tooth while keeping your wellness goals intact.
This comprehensive guide will teach you everything you need to know about making these irresistible treats. From ingredient selection to customization ideas, we’ve got all the tips and tricks to ensure your Cake Batter Protein Balls turn out perfectly every time. Whether you’re following a vegan, gluten-free, or paleo diet, a variation here will suit your needs.
Jump to RecipeWhat Are Cake Batter Protein Balls?
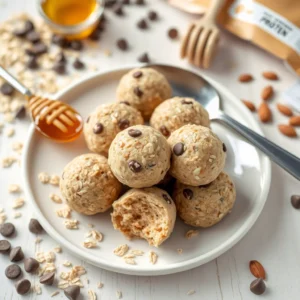
At their core, Cake Batter Protein Balls are bite-sized snacks made from a mixture of oats, protein powder, nut butter, and other wholesome ingredients. They mimic the creamy, indulgent texture of cake batter but come packed with nutrients instead of empty calories. Unlike traditional cakes, these balls require no baking—just mix, roll, chill, and enjoy!
These protein-packed snacks are incredibly versatile. You can customize them with various add-ins like chocolate chips, nuts, seeds, and spices to create unique flavors tailored to your palate. Plus, they’re convenient for busy lifestyles, as they can be prepped ahead of time and stored in the fridge or freezer for quick access whenever hunger strikes.
Why Should You Make Cake Batter Protein Balls?
Before we jump into the recipe, let’s explore why these protein balls deserve a spot in your snack rotation:
1. Rich in Protein
Protein is essential for muscle repair, satiety, and overall energy levels. By incorporating protein powder into these balls, you’re ensuring each bite provides a solid nutritional punch.
2. No-Bake Convenience
Who has time to heat the oven during a busy week? These Cake Batter Protein Balls require zero cooking, meaning you can whip up a batch in under 30 minutes without breaking a sweat.
3. Customizable Flavors
Whether you prefer classic vanilla, chocolatey goodness, or fruity flair, these balls adapt easily to your favorite tastes. Experiment with extracts, spices, and mix-ins to keep things exciting.
4. Perfect for Any Diet
This recipe is naturally adaptable to dietary restrictions. Swap out ingredients to make it vegan, gluten-free, paleo-friendly, or low-calorie—it’s entirely up to you!
5. Great for On-the-Go Snacking
Pack a few of these protein balls in your bag for work, school, or gym sessions. They’re compact, portable, and won’t spoil quickly, making them ideal for active individuals.
The Ultimate Recipe for Cake Batter Protein Balls
Ready to get started? Follow this step-by-step guide to create delicious Cake Batter Protein Balls at home.
Ingredients for cake batter protein balls (Makes 12-15 Balls)
Base Ingredients:
- 1 cup rolled oats (or certified gluten-free oats)
- 1/2 cup whey or plant-based protein powder (choose based on dietary needs)
- 1/4 cup almond butter (or peanut butter for added richness)
- 2 tablespoons honey or maple syrup (adjust sweetness to preference)
- 1/4 cup unsweetened applesauce
- 1 teaspoon vanilla extract
- Pinch of salt
Optional Add-Ins:
- 1/4 cup mini chocolate chips (dairy-free if preferred)
- 1/4 cup chopped nuts (almonds, walnuts, pecans)
- 1 tablespoon chia seeds or flaxseeds
- Sprinkle of cinnamon or cocoa powder for extra flavor
Instructions
- Prepare Your Mixing Bowl
Begin by combining the rolled oats and protein powder in a large mixing bowl. Stir thoroughly to ensure even distribution. This forms the base of your Cake Batter Protein Balls. - Add Wet Ingredients
Next, add the almond butter, honey/maple syrup, applesauce, and vanilla extract to the dry ingredients. Mix everything until a dough-like consistency forms. If the mixture feels too dry, gradually add a splash of milk (almond, oat, or regular) until it reaches your desired texture. - Incorporate Add-Ins
Fold in any optional ingredients such as chocolate chips, nuts, or seeds. These additions not only enhance the flavor but also provide extra crunch and nutrition. - Form Into Balls
Using clean hands, roll the mixture into bite-sized balls. For uniformity, use a cookie scoop or tablespoon to measure each portion before shaping. Aim for roughly 1-inch diameter balls. - Chill Before Serving
Place the formed balls on a plate or tray lined with parchment paper. Transfer them to the refrigerator and chill for at least 30 minutes. Chilling helps the balls firm up and improves their texture. - Store Properly
Once chilled, transfer the Cake Batter Protein Balls to an airtight container. Store them in the refrigerator for up to one week or freeze them for longer storage. Freezing extends their shelf life significantly, so feel free to prepare a larger batch for future snacking.
Tips for perfect cake batter protein balls
To ensure your Cake Batter Protein Balls turn out perfectly, keep these tips in mind:
- Consistency Matters: The key to successful protein balls lies in achieving the right consistency. If the mixture is too crumbly, add more applesauce or nut butter. If it’s too sticky, incorporate additional oats.
- Use High-Quality Ingredients: Opt for organic, non-GMO protein powders and natural sweeteners whenever possible. Better-quality ingredients yield better-tasting results.
- Don’t Overmix: While it’s important to blend the ingredients well, avoid overworking the dough. Overmixing can lead to dense, unappealing balls.
- Experiment with Sizes: While standard-sized balls are convenient, consider rolling some smaller ones for portion control or larger ones for a filling snack.
Variations to Try
One of the best things about Cake Batter Protein Balls is their flexibility. Here are a few fun variations to try:
Chocolate Lovers’ Delight
For a richer flavor, substitute half of the protein powder with unsweetened cocoa powder. Increase the amount of chocolate chips for an extra decadent experience.
Craving something extra indulgent? Pair these Cake Batter Protein Balls with our High Protein Chocolate Mousse with Greek Yogurt for a double dose of chocolate goodness.
Fruity Twist
Add dried fruits like cranberries, raisins, or chopped dates to your mixture. For a fresh twist, fold in mashed banana or berries.
Nutty Goodness
Boost the crunch factor by adding chopped almonds, peanuts, or macadamia nuts. You can also coat the outside of the balls with crushed nuts for added texture.
Spiced Up Version
Sprinkle in a pinch of cinnamon, nutmeg, or ginger for warm, comforting flavors. This works especially well during colder months.
Peanut Butter Bliss
Swap almond butter for creamy peanut butter and increase the chocolate content for a peanut butter cup-inspired treat.
If you’re a fan of cookie dough, don’t miss our High Protein Cookie Dough Recipe—it’s just as satisfying and packed with nutrients!
Common Questions About Cake Batter Protein Balls
Can I make these balls vegan?
Absolutely! Simply replace the honey with maple syrup or agave nectar and choose a plant-based protein powder. Ensure any add-ins (like chocolate chips) are dairy-free.
How long do these balls last?
When stored in the refrigerator, Cake Batter Protein Balls stay fresh for up to one week. In the freezer, they can last up to three months.
Can I use different types of flour instead of oats?
While oats are the most common choice due to their binding properties, you can experiment with ground flaxseed meal, almond flour, or coconut flour. Keep in mind that these alternatives may alter the texture slightly.
Are these balls safe for kids?
Yes! These protein balls are a fantastic way to introduce healthy fats and proteins into children’s diets. Just monitor the sugar content if using honey or maple syrup.
Nutritional Information Per Ball (Approximate)
Each ball contains:
- Calories: 100-120 kcal
- Protein: 6g
- Carbohydrates: 12g
- Fat: 5g
- Fiber: 2g
Conclusion
There’s no denying the appeal of Cake Batter Protein Balls. With their irresistible flavor, impressive nutritional profile, and ease of preparation, they’re sure to become a staple in your snack repertoire. Whether you’re enjoying them as a midday pick-me-up, pre-workout fuel, or guilt-free dessert, these bites offer convenience and satisfaction in equal measure.
For more creative recipes and healthy living tips, explore our website further. We cover everything from high-protein meals to low-calorie desserts, ensuring you have all the tools you need to live a balanced lifestyle. So what are you waiting for? Grab your ingredients and start rolling those delicious Cake Batter Protein Balls today!
Looking for a hearty breakfast option? Our Fluffy Sourdough Protein Pancakes with Whole Wheat are fluffy, nutritious, and sure to keep you full all morning.
Happy snacking! 😊
Cake Batter Protein Balls
Ingredients
- 1 cup rolled oats (or certified gluten-free oats)
- 1/2 cup whey or plant-based protein powder (choose based on dietary needs)
- 1/4 cup almond butter (or peanut butter for added richness)
- 1 tbsp honey or maple syrup (adjust sweetness to preference)
- 1/4 cup unsweetened applesauce
- 1 tsp vanilla extract
- 1 pinch salt
Optional
- 1/4 cup mini chocolate chips (dairy-free if preferred)
- 1/4 cup chopped nuts (almonds, walnuts, pecans)
- 1 tbsp chia seeds or flaxseeds
Instructions
- 1- Prepare Your Mixing Bowl Begin by combining the rolled oats and protein powder in a large mixing bowl. Stir thoroughly to ensure even distribution. This forms the base of your Cake Batter Protein Balls.
- 2- Add Wet Ingredients Next, add the almond butter, honey/maple syrup, applesauce, and vanilla extract to the dry ingredients. Mix everything until a dough-like consistency forms. If the mixture feels too dry, gradually add a splash of milk (almond, oat, or regular) until it reaches your desired texture.
- 3 – Incorporate Add-Ins Fold in any optional ingredients such as chocolate chips, nuts, or seeds. These additions not only enhance the flavor but also provide extra crunch and nutrition.
- 4- Form Into Balls Using clean hands, roll the mixture into bite-sized balls. For uniformity, use a cookie scoop or tablespoon to measure each portion before shaping. Aim for roughly 1-inch diameter balls.
- 5- Chill Before Serving Place the formed balls on a plate or tray lined with parchment paper. Transfer them to the refrigerator and chill for at least 30 minutes. Chilling helps the balls firm up and improves their texture.
- 6- Store Properly Once chilled, transfer the Cake Batter Protein Balls to an airtight container. Store them in the refrigerator for up to one week or freeze them for longer storage. Freezing extends their shelf life significantly, so feel free to prepare a larger batch for future snacking.
Notes
- Consistency Matters: The key to successful protein balls lies in achieving the right consistency. If the mixture is too crumbly, add more applesauce or nut butter. If it’s too sticky, incorporate additional oats.
- Use High-Quality Ingredients: Opt for organic, non-GMO protein powders and natural sweeteners whenever possible. Better-quality ingredients yield better-tasting results.
- Don’t Overmix: While it’s important to blend the ingredients well, avoid overworking the dough. Overmixing can lead to dense, unappealing balls.
- Experiment with Sizes: While standard-sized balls are convenient, consider rolling some smaller ones for portion control or larger ones for a filling snack.